The Emperor's Plaque
| The Emperor's Plaque | |
|---|---|
| [[|250px]] | |
| Statistics | |
| Given by | Kelly |
| Location | Aston |
| Rewards | 160,000 exp |
| Repeatable | No |
| Minimum Level | 56 |
| Recommended Level | 62 |
| Min Level For No Cap | 62 |
| Progression | |
| Unlocked by | Unlocks |
| Slay the Swampbeast | None |
Story
An ancient artifact recovered from the ruins of the palace after it's decline has been stolen from the vault at Wesley's bank. Kelly wants you to retrieve it from some not so friendly mages who are planning to resurrect the Emperor and turn him evil. They will attempt to demolish what has been rebuilt of Aston, including the Labyrinths. Destroying the Labyrinths would mean that the Imperial Army can no longer grow, as new adventurers rely on the power of the Labyrinth to fight Islena's minions. If they succeed, the fate of all Astonians will be grim.
Story by VelvetVampire creator of Caligar
Walkthrough
Quest Objectives
To complete this quest, the player must:
- Complete Looking for Caligar
- Complete Fighting Styles
- Complete Obelisk Hunt
- Complete Find the Keyparts
- Complete Assemble the Key
- Complete Amazon Invaders
- Recover the Emperor's Plaque and return it to Kelly.
Quest Walkthrough
Kelly asks you to recover the Emperor's Plaque. After completing Amazon Invaders, you should be with Homden. From there, head north to the top corner of the map where you'll find a hole, this is the entrance to Caligar Palace.
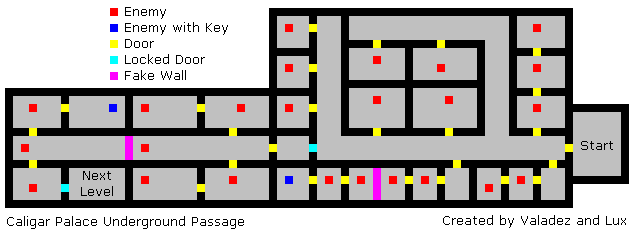
Underground Passage
This is the first section of the palace.
- Head into the hallway and go north-west. Enter the second door on your character’s left.
- Continue through the rooms until you hit a dead end. One of the walls is fake, go through it and continue to the next dead end, where you'll find an enemy holding a key.
- Backtrack to the corridor and continue north-west to a locked door. Use the key to proceed.
- In the next corridor, defeat the Skeleton at the end to access another fake wall.
- Beyond that, kill the enemy and go through the north-eastern door, then into the second room to loot another key.
- Return to the corridor, go through the other door, and in the second room are stairs leading to Level 1.
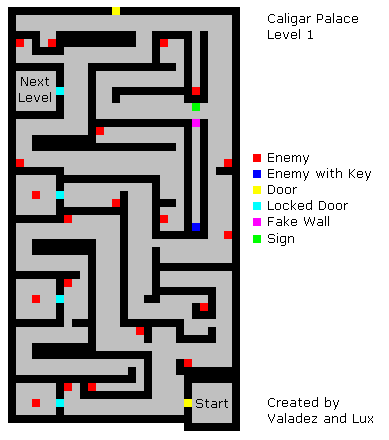
Level 1
- This level is dark, so bring a light source.
- It’s a maze filled with Skeletons, many hiding around corners.
- Find the key-holding Skeleton to unlock access to three Skeletons behind locked doors. These do not drop keys, but display a confirmation message when killed. Each player must kill them individually to progress.
- Once all are defeated, the path to Level 2 opens.
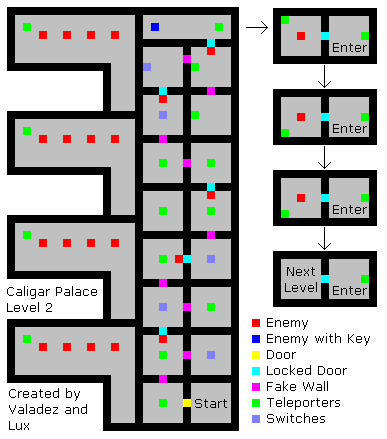
Level 2
- A puzzle zone with light orbs. Using the wrong one teleports you to a Zombie room, but you can return via the teleport inside.
- There are five sections of orbs. The 5th wrong orb sends you back to Level 1, so be cautious.
- At the end, you’ll find a Zombie with a key. Loot it and go through the red teleport.
- Kill another Zombie (with unlock confirmation), then continue through the teleport.
- Repeat this two more times (each Zombie must be killed individually by each player).
- Continue to reach the stairs to Level 3.
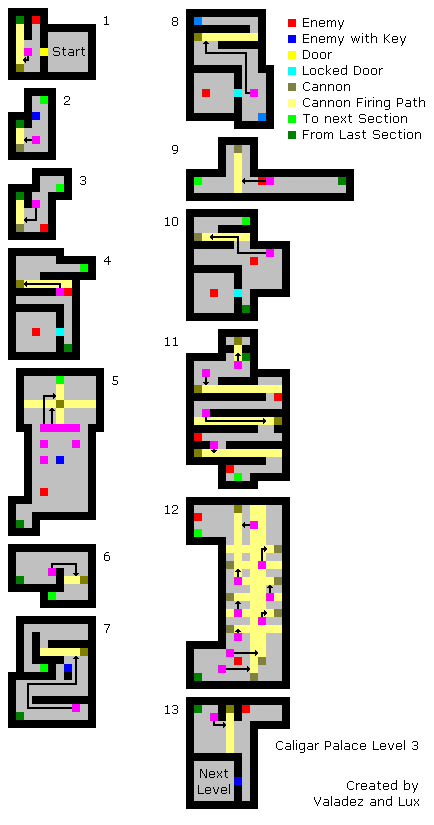
Level 3
This area is a cannon-based puzzle with Vampires.
- Cannons fire in fixed directions and do heavy damage. Pointed cannons only fire in one direction. Open cannons fire in four directions. North-east, south-east, south-west and north-west. Unlike the cannons in Earth Underground they won't fire at the player.
- When pushing boxes to block cannons, move carefully as shots can occasionally pass through if timed badly.
- Make sure to grab the key from the Vampire in part 2.
- Kill Vampires behind locked doors. Like earlier levels, you must kill the right ones to unlock the path forward. there are three of these Vampires that must be killed.
- Once all are dealt with, proceed to Level 4.
- If a box has been moved incorrectly and it can't be recovered return to a safe place then wait for five minutes for the box to reset.
Level 4
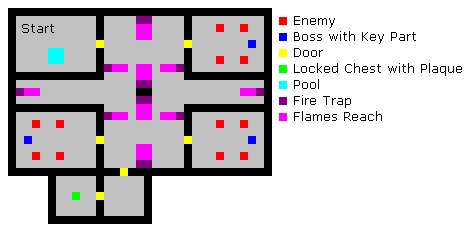
The final area, filled with Vampires, Zombies, Skeletons, and 3 Bosses, each carrying a key piece.
- The central room contains fire traps. They can be maneuvered around. If ignited, use the water pool in the starting room to douse the fire.
- After collecting all three key parts, combine them to form the final key.
- Head to the south-west room, enter the next, and open the chest to retrieve the Emperor's Plaque.
- Return it to Kelly for your reward.
